Can LEGO Play the Drums? Yes—And Here’s How to Build the Beat
Share
Turning Technic beams, cams, and gears into a real rhythm machine inspired by Brick Technology’s drum-playing LEGO build.
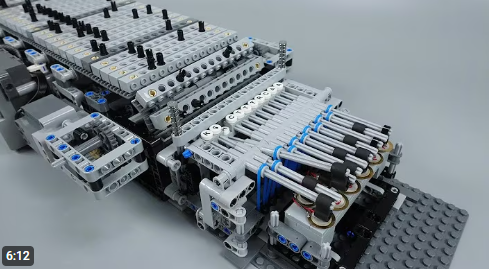
If you’ve ever tapped a rhythm on a baseplate while waiting for bricks to arrive, you already understand the magic behind mechanical music. The video “Can Lego Play the Drums?” shows that this idea can go much further: with clever Technic linkages and a bit of sound tech, LEGO can become a real drummer—triggering an electronic drum brain and DAW (music software) like a mechanical sequencer made of beams, axles, and gears. The project’s core concept is delightfully simple: rotating elements (wheels, cams, or custom “beat pins”) pass by fixed points to actuate switches or strike surfaces in time, sending pulses to a drum sound module that plays crisp, studio-grade hits. From there, you can shape, record, and layer the groove just like any other instrument track.
What’s so powerful about this approach is how it reframes Technic as an instrument of timing rather than just torque. Gear ratios become tempo controls. Axle spacing and cam placement become note density and groove. A friction pin added—or removed—acts like toggling a step in a drum sequencer. Because the “notes” are physical, the learning curve is tactile: beginners can literally see how a beat is constructed, while experienced MOCers can dial in micro-timing by shifting a cam one module forward or back. And since the output feeds a drum sound module and then a DAW, you’re not limited to plastic clicks; you can audition any snare, kick, or cymbal patch you like, capture MIDI or audio, and even quantize or effect-process the part. It’s the best of both worlds: the charm and teachability of kinetic sculpture with the professional polish of modern music production.
From a build perspective, the drum machine is really a family of small, specialized subsystems working in sync. A stable drivetrain (powered by a motor) sets the master tempo. Secondary shafts, each with their own cams or studded “program wheels,” handle individual voices (kick, snare, hi-hat). Adjustable followers—liftarms, lever arms, or spring-loaded strikers—convert rotation into repeatable taps or switch presses. You can mount piezo pads, tactile switches, or reflective sensors near those followers and route their signals into a drum module—then into your computer for arrangement. Swapping a 24-tooth gear for a 16-tooth nudges the tempo. Moving a cam one hole changes the phase. Adding a second cam doubles the pattern. These single-module adjustments make experimentation fast, musical, and addictive.
Educationally, it’s gold. Students see ratios in action, learn feedback and iteration (why does the snare drift after two minutes? what’s the fix?), and experience a satisfying “closed loop” where a physical action produces an audible result they can immediately evaluate. Creatively, it invites you to design patterns you might never program by mouse—swing that’s not exactly 57%, polyrhythms from mismatched wheel counts, or human-like flams made by two slightly offset followers on the same channel. And if performance is your aim, the contraption looks fantastic on camera or stage: a living, whirring groove box that audiences will feel as much as hear.
Below, you’ll find practical tips for building your own version, followed by a menu of MOC ideas that apply the same technique in fresh directions.
Tips: How to Use (and Build) a LEGO Drum Machine
-
Start with a rigid tempo spine. Build a braced frame for the main drive axle and support it every 6–8 modules to prevent flex at higher RPMs. Wobble = timing drift.
-
Use gears as time signatures. A 40-tooth wheel with four equidistant cams gives quarter notes; eight cams give eighths; mixing wheel sizes creates polyrhythms without code.
-
Cam and follower basics. Round cams yield softer feel; 1×1 round tiles on a wheel give sharper strikes. Add rubber elements (tires, bushings) on followers for quieter actuation.
-
Isolate each voice. Drive kick, snare, and hat off separate shafts with clutch gears—so one jam doesn’t stall the whole band.
-
Damp vibration. Sandwich motors with liftarms and include rubber feet under the base. Less resonance = cleaner triggers and less microphone bleed if you’re miking anything.
-
Reliable triggering. If you’re pressing switches, add hard stops so followers don’t over-travel. If you’re using piezo pads, mount them firmly and avoid double-hits by adding a light return spring.
-
Fine-tune the groove. Use half-bushings as “micro-spacers” to nudge cam positions. A ½-module shift can flip a stiff loop into a head-nodding beat.
-
Tempo control. Set base speed with gear reductions; make coarse changes by swapping gear pairs and fine changes with a simple variable-speed motor controller.
-
Quiet power. Balance your shafts (symmetrical cam placement) and avoid high-friction joints. The smoother the mechanics, the quieter the machine and the more consistent the timing.
-
Record smart. Route triggers to a drum module, then into your DAW on separate tracks. Print a click, capture a “dry” kit, and keep MIDI if your module supports it for easy edits later.
MOC Ideas That Use This Technique
-
Mechanical Step-Sequencer Panel: A wall-mounted grid of 6–8 program wheels, each controlling a different drum or synth trigger—great for classrooms or maker fairs.
-
Automaton Drummer Minifig Stage: Build a mini concert set where Technic linkages animate a drummer’s arms to hit real piezos hidden in the kit.
-
Polyrhythm Sculpture: Pair mismatched gear trains (e.g., 36-tooth vs 28-tooth) to create evolving 9:7 or 5:4 patterns—visually mesmerizing and musically rich.
-
MIDI-Triggered Kinetic Art: Replace drum hits with solenoid-tapped chimes or vibraphone bars; the same cam/follower logic drives mallets instead of switches.
-
LEGO Music Box 2.0: Use a wide “note cylinder” with removable studs/tiles so you can re-compose melodies and beats on the fly—like a programmable barrel organ.
-
Percussion Lab for Kids: Modular stations (kick/snare/hat) that students can re-gear and re-cam to discover tempo, subdivision, and dynamics by hand.
-
Hybrid Acoustic/Electronic Kit: Mechanical strikers hit real bongos or cowbells while also closing switches for layered electronic samples in the DAW.
-
Beat-Synced Light Show: Swap the drum module for a microcontroller/relay board and make each cam channel drive LED strips or stage lights for audio-reactive visuals.
LEGO has always been a toolkit for imagination, but projects like this push it into a new creative plane—where engineering, music, and design meet in a groove you can see. Whether you’re teaching ratios, composing your next track, or building a show-stopping kinetic sculpture, a Technic-powered drum machine is an unforgettable build and an endlessly tweakable instrument. Start with one wheel and one cam, add a second voice, then a third—before long, you’ll have a tight, characterful beat that’s 100% yours… and 100% LEGO. If you haven’t watched the inspiration yet, check out “Can Lego Play the Drums?” for a taste of what’s possible and then make it your own.
Disclaimer: This article was created with the assistance of AI. While efforts have been made to ensure accuracy and originality, the content may include automatically generated text and should be considered as informational only.
