Brick-Built, Fully Functional: What We Can Learn from the “Working LEGO® Laptop” Build
Share
Turning studs into circuitry—how a bold hybrid technique unlocks real, usable gadgets from bricks
Inspired by: “Building a Working LEGO Laptop…” by Brick Machines—an ambitious project that blends LEGO parts with real electronics and a few custom/3D-printed elements.
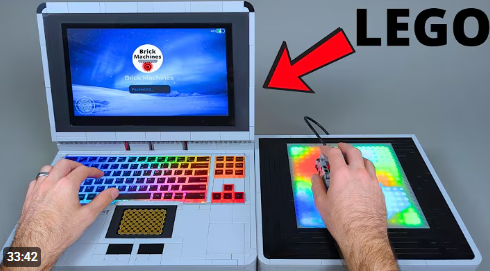
What happens when a classic brick-built aesthetic meets actual, everyday usability? The answer is a head-turning hybrid: a working laptop housed in LEGO. In Brick Machines’ video, the idea isn’t just to make a prop—it’s to build a device you can open, close, type on, and power like a real computer, inside a case made primarily from LEGO components. That leap—from model to functional object—is at the heart of a technique that’s quietly reshaping advanced MOC design.
At a glance, the magic looks simple: bricks, plates, and Technic beams form a clamshell chassis; inside sits a compact computing core with a display and keyboard. But the engineering challenge is anything but simple. You need rigidity without bulk, precise hinge geometry, clean cable routing, safe power delivery, and ventilation—all nested within a studded shell that must survive repeated open-close cycles. As the creator hints across projects, this category of builds often leans on extra electronics and 3D-printed helpers where LEGO alone can’t hit the tolerances for ports, cooling, or ultra-thin frames. Done thoughtfully, those additions don’t dilute the “LEGO-ness”—they enable it to cross the line into daily-use territory.
Why does this matter for MOC makers? First, it expands your design palette. Instead of treating electronics as a bolt-on afterthought, you can architect the brickwork around real-world constraints—from screen thickness to airflow channels—so the final thing is both beautiful and practical. Second, it encourages a systems mindset. You’re not just building a shell; you’re solving for ergonomics, heat, and durability. And third, it opens new categories: home-automation hubs, mini-arcades, MIDI controllers, desk accessories, and more—all with the unmistakable charm of LEGO surfaces and geometry.
The working LEGO laptop is also a masterclass in purposeful compromise. If a hinge must carry weight and hold angle precisely, Technic liftarms and axles might be reinforced with hidden metal shafts or a printed part acting as a bushing. If heat needs to escape, the designer can exploit stud gaps, grille tiles, and Technic frames to create vent paths that actually function. If tolerances are tight, a printed bracket or bezel provides the last millimeter so your screen sits flush and your keyboard doesn’t snag. None of this diminishes the craft; it elevates it—turning a playful medium into a legitimate prototyping platform.
Finally, there’s the impact on storytelling. A functional, brick-built gadget doesn’t just look cool; it invites interaction. Pick it up, flip the lid, press a key—every action reinforces the illusion that a toy became a tool, while reminding us that engineering and play are closer cousins than we think. If you’ve ever wanted your MOCs to leave the display shelf and join your daily workflow, this hybrid technique is your doorway.
Tips: How to use this hybrid LEGO + electronics technique
-
Start with the payload, then wrap the bricks. Measure your display, battery, board, ports, and keyboard first. Build the LEGO shell around those constraints so everything fits cleanly.
-
Design the hinge like a suspension. Use paired Technic liftarms and axles for stiffness; add friction pins or miniature detents so the screen holds angle.
-
Plan airflow paths early. Leave internal “wind tunnels” using Technic frames and grille tiles; avoid sealing batteries or CPUs inside solid brick walls.
-
Cable management = reliability. Create stud-in channels under plates; secure cables with flexible elements (hose, rubber 2L connectors) to prevent chafing at hinge points.
-
Use 3D-printed “interface” parts sparingly but smartly. Thin bezels, port frames, and internal brackets can solve tolerances bricks can’t—without stealing the show.
-
Prioritize safety. Stick to low-voltage DC power systems and proper battery protection; never enclose mains electronics in sealed LEGO.
-
Test cycles. Open/close the lid a few hundred times during prototyping; redesign weak points before the final pass.
-
Finish like a product. Hide studs where you want sleekness (tiles/curved slopes) and celebrate studs where you want LEGO identity.
Ideas: MOC types that shine with this technique
-
Mini Arcade Cabinet / Retro Console: Brick chassis housing a small display and gamepad controls for emulation.
-
Smart Desk Hub: USB-C dock or wireless-charging station inside a tiled LEGO plinth with cable pass-throughs.
-
E-Paper Notepad: Thin clamshell with an e-ink panel; perfect for to-do lists, calendars, or signage.
-
Synth/MIDI Controller: Brick faceplate with real knobs and sliders (through-holes in Technic bricks), USB-MIDI brain inside.
-
Home Automation Console: Wall-mounted plate with touch display for lights, sensors, and cameras.
-
Portable Photo Light Box: LED strips in a brick frame with diffusers; foldable like a mini studio.
-
Retro “Cyberdeck”: LEGO-skinned portable workstation—keyboard, screen, battery—styled in classic space or cyberpunk themes.
-
Smart Clock / Info Panel: Modular tiles around a display show weather, calendar, and notifications.
The working LEGO laptop isn’t just a flashy one-off—it’s a roadmap for functional LEGO design. By blending bricks with careful electronics, smart hinges, airflow planning, and the occasional printed bracket, your MOCs can become real tools you’ll use every day. If this build lit a spark, pick a small gadget you already love—then brick it, wire it, and make it yours. And when you open that lid for the first time and everything just works, you’ll feel the same rush that makes projects like Brick Machines’ laptop unforgettable.
Disclaimer: This article was created with the assistance of AI. While efforts have been made to ensure accuracy and originality, the content may include automatically generated text and should be considered as informational only.

