LEGO Photography: Tiny Bricks, Big Stories
A practical LEGO photography tutorial with tips, setups, and scene ideas
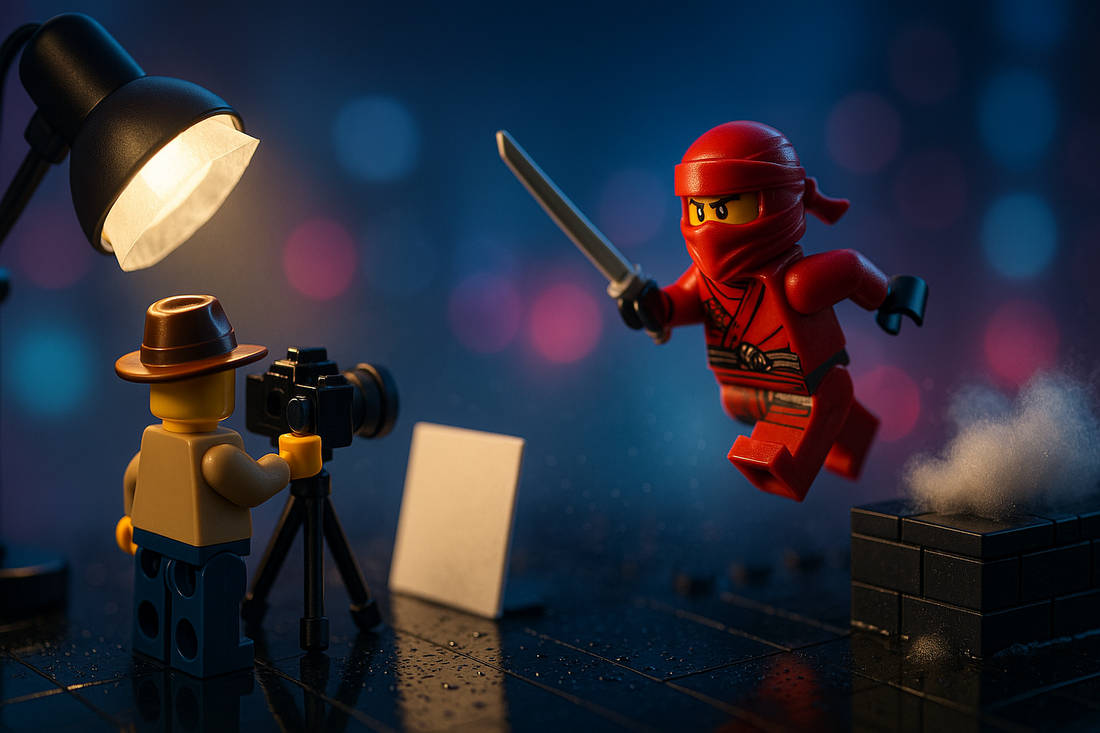
If you’ve ever paused mid-build to admire a minifigure’s expression or the geometry of a brick wall, you’ve already felt the spark that makes LEGO photography so addictive. It’s the art of turning small plastic worlds into big cinematic moments—no massive studio, fancy gear, or endless budget required. With a desk lamp, a bit of blue-tack, and a curious eye, you can stage action scenes that feel epic, slice-of-life vignettes that feel cozy, and macro portraits that make a single minifigure look like a movie star. Think of your table as a set, your bricks as props, and your camera (or phone!) as the director guiding the story.

The magic starts with scale. Minifigures read best at “eye level,” so get low—really low. When your lens meets their gaze, the scene feels true. Next comes light: soft, directional light creates shape and drama; hard light with deep shadows screams midday chase scene. A $5 sheet of white foam board becomes a perfect bounce card, and a semi-transparent plastic folder doubles as a diffuser. Backgrounds can be as simple as colored paper, a printed gradient, or a custom brick wall you build in minutes. Want a city skyline? Stack plates in silhouette. Need a forest? Layer green slopes and leaf elements, then shoot shallow depth of field so it melts into bokeh.
Story is your anchor. Ask: Who’s the hero? What just happened? What will happen next? A tipped mug suggests chaos; a missing brick hints at a mystery; a single spotlight isolates a character’s mood. Subtle practical effects—cotton for smoke, fishing line for flying, a spray bottle for rain—push your stills from “nice” to “whoa.” Finally, edit lightly. Lift shadows, nudge contrast, and cool or warm the white balance to match your intent. Whether you’re after clean product-style shots or gritty “on-location” adventures, a consistent look will tie your gallery together.

Below is your friendly, no-nonsense LEGO photography tutorial with actionable LEGO photography tips, plus heaps of ideas for LEGO photos—including LEGO pictures NINJAGO fans will love, and compositions that are easy to copy or even print as posters.
Quick LEGO Photography Tutorial (Step-by-Step)
-
Plan the micro-story (1 minute).
Hero, goal, obstacle. Sketch a three-beat sequence if you can. -
Build the set.
-
Foreground: 1–2 small props (barrel, crate, bush) for depth.
-
Midground: minifigure action.
-
Background: simple, unfussy—paper, cloth, or a brick wall.
-
-
Light the scene.
-
One key light (desk lamp or LED panel) at 45°.
-
Diffuse with baking paper or a translucent folder.
-
Add a white card opposite as fill.
-
Optional rim light behind for separation.
-
-
Stabilize.
Use a mini-tripod or stack bricks as a camera stand. Enable a 3–10s timer. -
Camera basics (phone or camera).
-
Focus on the minifig’s eyes.
-
Lower ISO for clean files; let the shutter slow (tripod helps).
-
If you have aperture control, use f/2.8–f/5.6 for nice background blur.
-
Lock exposure on the face; adjust brightness to taste.
-
-
Pose & polish.
Micro-tilts matter: turn the head 5–10°, angle the hips, bend the arms asymmetrically. -
Practical effects.
Blue-tack under feet, a hidden clear bar for jumps, cotton for smoke, spritz water for rain. -
Edit lightly.
Crop for impact, lift shadows, add a touch of clarity, and keep colors consistent across the set.

Pro LEGO Figure Photography Tips
-
Eye-level rule: Always start at minifigure eye height; break it later for drama.
-
Color harmony: Limit scenes to 2–3 dominant colors to avoid visual noise.
-
DIY diffusers: Baking paper taped to a lamp = softbox.
-
Bokeh on a budget: Place tiny fairy lights far behind your subject for dreamy backgrounds.
-
Invisible support: Use clear antenna bars or trans-clip hinges; clone them out in editing.
-
Clean plastic, cleaner pixels: Wipe fingerprints and dust; macro reveals everything.
-
Build a “LEGO picture holder”:
2× 2×4 bricks + 1 hinge plate + 1 tile = a tilted phone stand or backdrop clip you can position anywhere. -
Consistency for sets to print: Shoot a whole series with the same height, light direction, and background; perfect for LEGO pictures to print as a grid.

15 Lighting “Recipes” to Try
-
Window Portrait: North-facing window + white card fill = soft, natural look.
-
Noir Detective: One bare lamp from above, black background, heavy shadows.
-
Sunset Adventure: Warm gel (orange paper) on key, cool fill (blue paper) opposite.
-
Blue Moon Night: Key bounced off blue card; tiny rim light behind.
-
Campfire Glow: Orange LED under a translucent round brick “flame.”
-
Hologram Lab: Shine through trans-blue elements to cast sci-fi patterns.
-
Storm Rain: Spray bottle mist + backlight = sparkling “rain.”
-
Light Painting: Long exposure, wave a small flashlight behind the figure.
-
Miniature Sunrise: Low key light skimming a plate “horizon.”
-
TV Flicker: Phone screen on white at 15% brightness as fill.
-
Tunnel Chase: Shoot through stacked arches; light from the exit.
-
Window Blinds: Cardboard strips on lamp to cast stripes.
-
Neon Alley: Colored paper reflectors (magenta/teal) for cyberpunk vibes.
-
Volcanic Ember: Red light from below, smoky cotton layers.
-
Museum Display: Two soft lights, neutral background for clean “catalog” shots.
25 Ideas for LEGO Photos (Copy-Friendly Prompts)
-
NINJAGO rooftop duel at blue hour—two ninjas, cool backlight, flying dust (cotton).
-
NINJAGO elemental splash—Kai leaps through real water droplets; fast shutter or freeze with flash.
-
City coffee break—barista serving a minifig; warm window light, shallow DOF.
-
Spacewalk repair—astronaut on a trans-clear bar; starry paper backdrop.
-
Medieval gate at dawn—low raking light across textured masonry bricks.
-
Underwater dive—shoot through a glass pan of water above the set for refraction.
-
Supercar pit stop—motion blur on a rolling wheel (drag shutter).
-
Pirate treasure reveal—gold chrome parts sparkling; dark surrounding set.
-
Forest scout—layered leaf elements; foreground blur with a leaf close to lens.
-
Winter snowball fight—baking soda “snow,” cool white balance.
-
Mech silhouette—backlight only, bright rim edges, smoky cotton.
-
Castle banquet—warm candles (orange LEDs) and food tiles.
-
Railway platform goodbye—rule of thirds, leading lines of tracks.
-
Desert speeder—kicked-up “sand” with flour; low angle.
-
Haunted corridor—green gel, fog cotton, one eye highlight.
-
Sports victory pose—confetti (paper dots) mid-air, fast shutter.
-
Police chase—light bars as practical light sources; blue/red spill.
-
Arcade glow—phone screen as neon sign behind minifigs.
-
Kitchen chaos—tiny studs as spilled cereal; dynamic poses.
-
Jungle temple—vines (whips) and moss (green fabric fuzz).
-
Knight vs. dragon—forced perspective: small dragon closer to lens, knight farther.
-
Library study—book tiles, soft side light, warm tone.
-
Beach day—sanded tan plates + water spray for sparkle.
-
Airfield sunrise—plane tailfin silhouette; gradient paper sky.
-
Robotic lab—trans-neon parts glowing; reflective black tile floor.

Extra Tools & Helpers
-
LEGO photographer minifigure as a recurring mascot—great for behind-the-scenes shots.
-
Storage to keep sets dust-free: clear boxes so scenes stay ready between sessions.
-
Mini stands & clamps: hinge plates + tiles for quick adjustable supports.
-
Backdrop binder: A4/A3 colored papers, gradients, and printed skies.
Final Tips (Checklist)
-
Keep it at minifig eye level.
-
One story per frame—remove extras.
-
Soften your light; add a tiny rim.
-
Stabilize, then lower ISO.
-
Pose with small angles.
-
Clean bricks = clean photos.
-
Batch shoot in series for consistent looks.
Whether you’re building a moody detective alley or LEGO pictures NINJAGO with high-energy duels, the core remains the same: light with intent, compose with purpose, and let tiny characters carry big emotions. Happy shooting!

