LEGO Paper Shredder: What We Can Learn from Brick Experiment Channel’s Gear-Powered Build
Share
A deep dive into the “Shredding Paper with Lego Gears (ver 2)” experiment—and how to adapt its clever gear mechanics for your own MOCs.
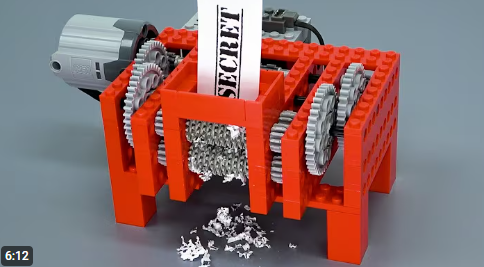
Every once in a while, a simple idea—executed patiently, iterated thoughtfully, and filmed clearly—teaches more about engineering than a thick manual. Brick Experiment Channel’s “Shredding Paper with Lego Gears (ver 2)” is exactly that kind of lesson. The premise sounds almost like a joke: can LEGO gears actually shred paper? But the video doubles as a compact masterclass in testing, failure analysis, gearing, torque, and material behavior. In version 2, the builder emphasizes improved reliability and a smaller cut size, and even specifies the test material (standard ~90 g/m² printer paper)—which tells you right away this isn’t just a stunt; it’s an experiment tuned around real constraints.
If you remember the original “Shredding Paper with Lego Gears” video, you’ll know the journey began years ago with a classic set of trials: different gear trains, contact surfaces, and capture paths for the paper, all searching for a repeatable “bite.” Version 2 stands on those shoulders, showing how small mechanical changes (like gear selection and alignment) can transform a fragile prototype into something consistently functional. That continuity between v1 and v2 is part of the charm: the project demonstrates how LEGO Technic allows you to iterate quickly, measure results, and lock in improvements—a familiar loop to anyone who’s ever tuned a gearbox or rebuilt a mechanism after a jam.
The key insight is that paper doesn’t behave like a rigid object you “cut” so much as a flexible sheet you must grip, deform, and shear. Two counter-rotating shafts packed with meshing gears create tiny pinch points and lateral shear that progressively fracture the fibers. In practice, that means gearing choices matter (to provide torque at low speed), alignment matters (to maintain consistent engagement along the width), and rigidity matters (to keep the axle centers locked under load). It also means you need a controlled feed path and a way to keep the paper guided so it doesn’t buck, twist, or “accordion” on entry.
Version 2’s improvements are visible in the cut size and repeatability—two metrics that define any shredder’s credibility. The builder accepts that, with stock LEGO parts, you can’t expect to chew a full A4 sheet edge-to-edge; instead, you get narrow strips—and you get them reliably. That compromise is actually the heart of smart prototyping: match the mechanism to the material and the parts you have. Reports covering the build call out that limitation explicitly (narrow feed = narrow strips), but that’s a fair exchange for a fully LEGO solution and a great teaching tool about torque management and failure modes (like jamming and self-destruction).
For MOC builders, the real value isn’t the paper confetti—it's the technique: dense gear arrays as active rollers, offset to generate shearing action, geared down for torque, braced inside rigid frames, and fed with guides that keep the workpiece in the bite zone. Once you internalize that recipe, you can adapt it to all kinds of builds: factories, workshops, sorting lines, theme-park props, even puzzle contraptions. The video becomes less a destination and more a blueprint for your own experiments.
Tips: How to Use (and Adapt) the Technique
-
Start with torque, not speed. Gear down your motor (e.g., 3:1–9:1 total reduction) so the shafts roll slowly but won’t stall under load. Use XL/L motors or dual-motor inputs if available.
-
Build two rigid shafts. Use 5×7 frames, liftarms, and triangle bracing to lock axle spacing. Flex = gear skip = jams.
-
Pack the “tooth line.” Use closely spaced spur or bevel gears along both shafts to create many pinch points; stagger/offset neighboring teeth slightly for better shearing.
-
Guide the feed. Add funnels and side rails so the paper enters straight. A smooth top pressure guide (tile-lined) helps maintain contact.
-
Test narrow first. Feed 1–2 cm paper strips before trying wider pieces; scale width only after your bite is consistent. Coverage beats ambition.
-
Control ejection. Give shredded strips a clear exit chute so they don’t back-feed and jam the gears.
-
Check for slip. Reinforce axle-to-gear connections (bushings, stop-bushings, double connectors) and watch for half-bush creep under load.
-
Mind heat & current. Long stalls overheat motors/batteries. Use lower voltage or duty-cycle tests, and never leave it unattended.
-
Safety first. Keep fingers, hair, cords, and cloth away from the rollers; run under adult supervision and shred paper only.
Ideas: MOCs That Can Use This Gear-Shredder Mechanic
-
Micro Recycling Plant: Paper in → strips out; add conveyors, balers, and a sorter for a satisfying “process line.”
-
Factory Diorama: Integrate the shredder as a “reject” station next to a stamping press or box-maker.
-
Theme-Park Prop: A “ticket muncher” that feeds used stubs and spits confetti into a clear bin.
-
Spy HQ / Office Scene: A mini document-destruction room with blinking lights and warning decals.
-
Puzzle Trap/Adventure Build: A rolling hazard the hero must bypass—great for NINJAGO or Agents scenes (use scrap paper only!).
-
Workshop Tool Wall: Pair with a Technic bandsaw, drill press, and sander for a complete maker space.
-
STEM Demonstrator: Classroom model showing shear vs. tension; swap paper for different media (thin card vs. tissue) to compare results.
Brick Experiment Channel’s version 2 paper shredder is more than a viral curiosity—it’s a clean, teachable pattern for grip + shear using dense gear arrays, torque-first gearing, and disciplined bracing. If you treat it as a module, you can drop the same mechanic into dioramas, factories, and interactive displays across your LEGO world. Start narrow, build rigid, gear down, and iterate—just like the video did from the original to v2. When the strips start flowing, you’ll know you’ve dialed in the bite. Then the fun begins: connect it to conveyors, add sensors, or sync it to music. And if you want inspiration or a refresher on the evolution of the build, revisit the original experiment and the updated v2 description to see how small changes add up to reliable performance.
Disclaimer: This article was created with the assistance of AI. While efforts have been made to ensure accuracy and originality, the content may include automatically generated text and should be considered as informational only.