How to Remove LEGO® Stickers Without Damaging Them
Share
Preserve your parts, save your decals, and keep your builds looking sharp
Removing stickers from LEGO bricks can feel risky: pull too fast and the decal tears; use the wrong solvent and you can haze the plastic or wipe printed decorations. The good news? With the right prep and a gentle workflow, you can lift most stickers cleanly, salvage many of them for reuse, and leave your parts looking fresh for the next MOC. This guide covers safe, builder-tested methods for how to remove stickers on LEGO pieces, how to restick LEGO stickers when possible, and—if you’d rather skip stickers entirely—clever ways to design around them.
Before we start, it helps to understand what you’re working with. Most modern LEGO stickers are thin, paper-based decals with pressure-sensitive adhesive. Over time, heat, UV, and skin oils dry that adhesive and make removal trickier. That’s why older sets sometimes shred on lift or leave tacky residue. The core strategy is simple: soften the glue with mild heat, separate sticker from plastic with a non-marring tool, then clean any remaining residue with safe, plastic-friendly products. If you’d like to reuse the sticker, you’ll transfer it to release paper (like baking parchment or wax paper) and store it flat until you’re ready to restick.
Just as important are the don’ts. Avoid acetone, nail-polish remover, lighter fluid, and other harsh solvents—these can melt ABS or fog the surface. Go easy around printed parts: even isopropyl alcohol can dull pad-printing if you rub aggressively. Always test anything new on a hidden area first.
Prefer to skip stickers? You’re not alone. Many MOC builders avoid them to keep parts universal and long-lasting. Later in this article you’ll find practical, good-looking sticker-free design ideas—brick-built stripes, SNOT lettering, color blocking, and more—that keep your models readable and display-ready without a single decal. For collectors, going sticker-free also preserves part value and makes cleaning easier. And if you still love the graphic pop of a logo or dial, there are ways to re-apply removed stickers neatly or source printed alternatives.
Whether you’re refreshing a dusty classic, parting out a set for your next project, or just fixing a crooked badge, the methods below will help you remove stickers from LEGO parts safely, cleanly, and with minimal drama.
Tools & Setup (quick checklist)
-
Hair dryer (low heat)
-
Plastic spudger / old guitar pick / thin brick separator edge
-
Dental floss (unwaxed) or sewing thread
-
Tweezers (fine tip)
-
Cotton swabs & microfiber cloth
-
Mild dish soap + warm water
-
70% isopropyl alcohol (for residue only)
-
Citrus-based adhesive remover (optional, sparing use)
-
Baking parchment or wax paper (for saving stickers)
-
Zip bag or card sleeve for storage
Step-by-step: How to remove stickers on LEGO
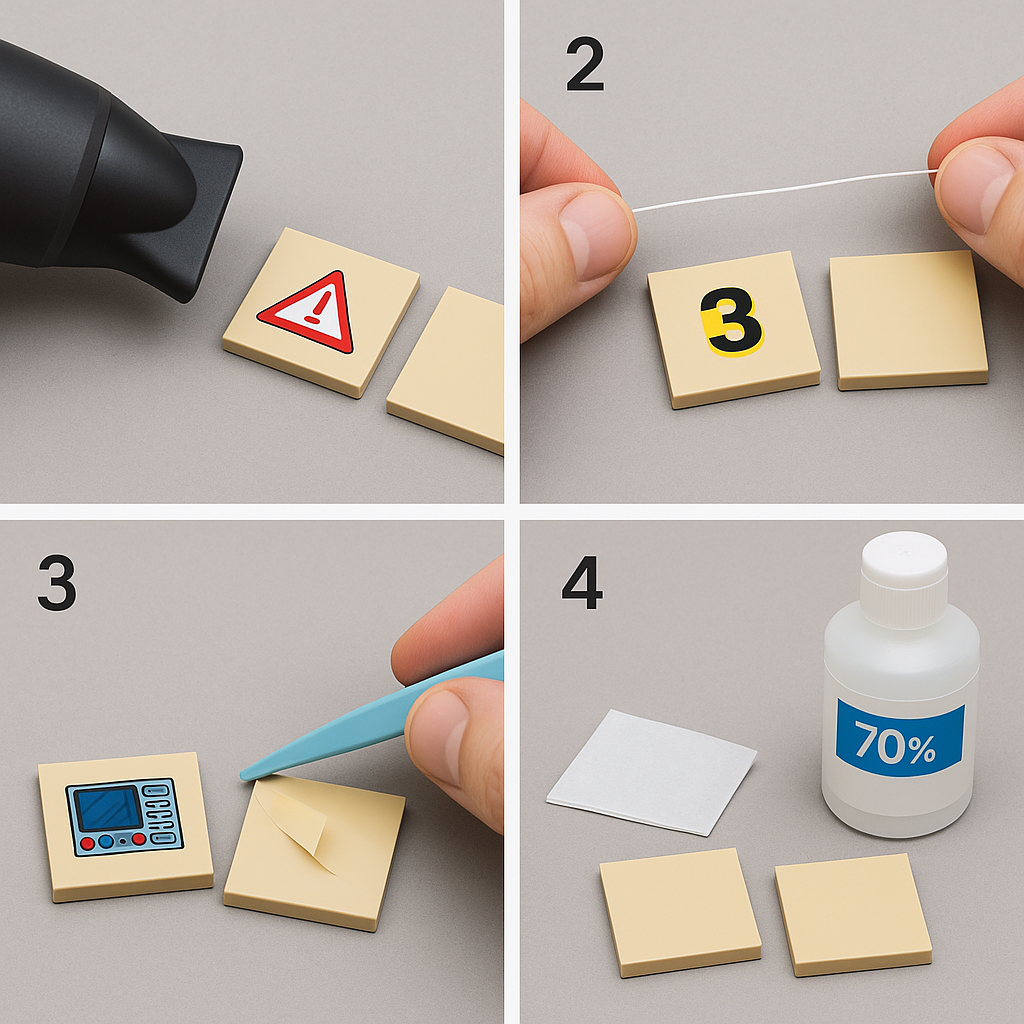
Method 1: Low-heat lift (best all-rounder)
-
Warm the sticker with a hair dryer on low for 10–15 seconds from ~10–15 cm away. You want gently warm, never hot.
-
Start a corner using a spudger or guitar pick—no metal blades.
-
Slow, low pull: peel the sticker back over itself at a shallow angle (≈10–20°). Re-warm as needed.
-
Save it: if reusing, transfer immediately to parchment/wax paper, adhesive side down, and smooth bubbles.
Method 2: Floss glide (great for brittle decals)
-
Warm the sticker lightly.
-
Slide unwaxed dental floss under a corner and use a gentle sawing motion to separate sticker from brick.
-
Lift off with tweezers and park on parchment paper.
Method 3: Residue removal (after the sticker is off)
-
Start with warm soapy water on a microfiber cloth.
-
If residue persists, use a tiny amount of 70% isopropyl alcohol on a cotton swab; wipe, then immediately buff dry.
-
For stubborn patches, a citrus adhesive remover can help—apply sparingly to the residue only, avoid printed areas, and wash with soapy water right after.
Avoid: acetone, paint thinners, abrasive pads, and extended soaking of stickered parts (paper can bleed and smear).
How to restick LEGO stickers (when reuse makes sense)
-
Best surface prep: clean the brick with mild soap and dry thoroughly—oils kill adhesion.
-
Sticker still tacky? Reapply with tweezers, starting from one edge and smoothing with a microfiber cloth.
-
Tired adhesive? Use a thin, acid-free double-sided adhesive sheet (archival scrapbooking type). Stick the old decal to the sheet, trim to size with a sharp craft knife, and apply to the brick.
-
Repositionable option: an acid-free restickable glue stick (very thin coat) can work for display models; avoid thick application to prevent squeeze-out.
-
Storage: keep rescued stickers flat on parchment in a card sleeve or zip bag, away from heat and sun.
Reality check: very old, brittle, or torn decals may not be worth rescuing. In those cases, consider going sticker-free or replacing with printed parts.
Better than stickers? Design ideas that skip decals entirely
-
Brick-built stripes & logos: use plates, tiles, and cheese slopes for patterns and insignias.
-
SNOT lettering: build letters with 1×1 tiles/plates on their sides for signage and race numbers.
-
Color blocking: simulate liveries with bold color fields; no tiny alignment needed.
-
Textured panels: grills, jumpers, and wedges create visual interest where a sticker would.
-
Printed substitutes: where accuracy matters, source printed tiles from part marketplaces rather than decals.
-
Swappable modules: design signs/badges as clip-on sub-assemblies you can redesign anytime—no adhesive required.
“Don’t do this” quick list
-
Don’t use acetone or nail-polish remover (melts ABS, removes prints).
-
Don’t scrape with metal blades.
-
Don’t rub printed decorations with alcohol.
-
Don’t yank cold stickers—warm first.
-
Don’t flood parts with citrus remover; spot-treat and wash off.
With a little heat, patience, and the right tools, you can remove stickers from LEGO cleanly, rescue many for reuse, and keep your collection ready for the next creative build—stickers optional.

