Fully Automated LEGO Car Factory – Turning Bricks Into a Working Assembly Line
Share
How a pick-and-place gantry, clever fixturing, and careful calibration build a LEGO car from start to finish
If you’ve ever lined up sub-assemblies on your desk and imagined a tiny robot snapping them together, this project is that daydream brought to life. In the video “I Built a Fully Automated LEGO Car Factory,” Banana Gear Studios designs a working assembly line that picks parts, positions them with millimetric accuracy, and builds a complete LEGO car—no human hands required.
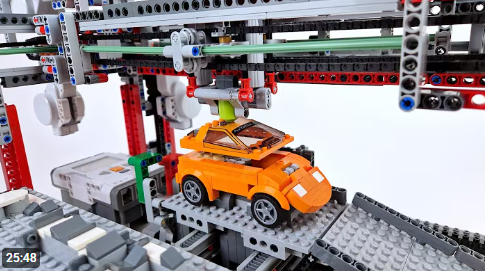
At the heart of the build is a three-axis gantry that behaves like a miniature industrial pick-and-place robot. A gripper rides on long Technic axles used as rails, with rollers to keep motion smooth and straight. Chain drives—pre-tensioned to remove slack—translate precise rotary motion into linear travel so the tool can hit the same coordinates repeatedly. That mechanical discipline matters because the factory doesn’t just “drop” parts; it must align studs and tubes perfectly or a placement will fail. To improve reliability, the creator programs a subtle “wiggle” maneuver—tracing a tiny square before pressing down—so the part self-seats the way we instinctively do with our fingers. This one tweak moves the success rate from early frustration to consistent, satisfying snaps.
The workflow feels industrial: seven prebuilt modules wait on pallets (chassis, front wheels, rear wheels, engine, front body, rear body, and windscreen). The gantry fetches each in sequence and builds on a jigged platform with prongs that hold the chassis square; a green/red control releases the finished car to roll down a ramp. The choreography isn’t guesswork either—the builder mapped a 3D coordinate grid and translated each target into motor rotations, scheduling more than a hundred individual motions to create one car. It’s a brilliant marriage of Technic mechanics and methodical planning.
For MOC makers, the magic isn’t just that “it works.” It’s the transferable technique: modular parts on pallets, rigid fixturing at the assembly station, backlash-free motion, and software that treats the build as a repeatable program. Whether you’re into Speed Champions displays, Technic robotics, or educational demos, this factory is a blueprint for turning your models into experiences—something people can watch, understand, and remember. And because the car is composed of logical sub-assemblies, you can easily swap colors, redesign modules, or scale the concept to a totally different product without rethinking the entire line. It’s the kind of project that elevates a collection from “cool builds” to “living exhibit.”
Tips: How to Use (and Rebuild) This Technique
-
Start with pallets & a jig. Build each sub-assembly on identical “pallets” so the gripper always meets the same geometry, and create an assembly jig (two fixed prongs or fences) to lock the chassis square before stacking parts.
-
Fight backlash early. Pre-tension chain or gear trains and add hard stops where you can; small slop looks huge at the end of a long gantry.
-
Use rails and rollers. Long Technic axles make excellent rails; pair them with rollers/bearing wheels for smooth travel under load.
-
Program a “stud-finding” wiggle. Add a tiny square-trace before every press to help studs self-locate and seat. It’s simple and massively boosts reliability.
-
Grid your workspace. Place a transparent grid over your build area and record coordinates in a spreadsheet; convert positions to motor rotations so your line is repeatable and editable.
-
Design for recoveries. If a placement fails, have your code back off, re-wiggle, and try again. Add a safe “home” routine between steps.
-
Keep modules swappable. Treat each sub-assembly as a black box—same outer geometry, different internals—so you can upgrade the product without rewriting the program.
-
Measure success. Track cycle time and first-pass yield; small tweaks (slower approach speeds, deeper jig walls) often beat big mechanical overhauls.
Ideas: MOCs You Can Build With This Automation Approach
-
Minifig assembly line – torsos, legs, heads on pallets; optional “printing” station with decals.
-
Wheel & tire installer – dedicated press to mount tires, then an alignment check station.
-
Brick sorter + kitting cell – color/size sort into trays, then kit a set of parts for a micro-build.
-
Mosaic placer – gantry that lays 1×1 tiles onto a baseplate following a pixel image.
-
Candy or bead packaging line – weigh, fill, seal (LEGO mechanism for fun), then push to a ramp.
-
GBC feeder – automated loader that assembles mini modules and feeds them into a Great Ball Contraption.
-
Body-swap car factory – keep one chassis, auto-install different bodies/hoods for “trim levels.”
-
Quality-check cell – probe heights/clearances with a feeler mechanism, eject rejects to a rework bin.
-
Micro-robot palletizer – stack boxes (2×2 bricks) onto a tiny pallet with interlocking patterns.
-
Educational demo – mount the line on a board with labels for each station to teach automation concepts.
Projects like Banana Gear Studios’ car factory remind us that LEGO can be more than static models—it can be systems. When you combine consistent fixturing, backlash-aware motion, and smart programming, you don’t just “build a thing,” you build a process that others can watch and learn from. Start small: two stations, one jig, a repeatable motion. Once your line runs clean for ten cycles in a row, add the next station. Before long, you’ll have your own tiny factory turning a pile of bricks into a showpiece—on loop, all day. And that’s the kind of MOC people will queue up to see.
Disclaimer: This article was created with the assistance of AI. While efforts have been made to ensure accuracy and originality, the content may include automatically generated text and should be considered as informational only.

