Racing Loops in Perfect Sync: A LEGO Theme Park Coaster You Can Automate
Share
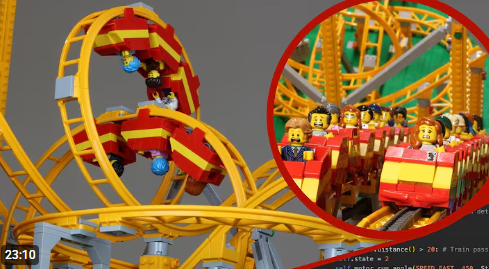
What we can learn from Lasse Deleuran’s intertwined, sensor-driven loop coaster—and how to apply the same Pybricks technique to your own MOCs.
Every now and then a LEGO build pops up that feels less like a model and more like a show. Lasse Deleuran’s “LEGO Theme Park Roller Coaster V1.0” is exactly that: two trains threading an intertwined set of loops in a tight “knot,” timed so precisely that you get near-misses, split-second crossovers, and that delicious theme-park suspense usually reserved for real steel. Under the hood, the magic isn’t luck—it’s control. The layout uses a LEGO Spike Prime hub running Pybricks (Python for LEGO hubs) to coordinate lifts and trains, plus a small network of sensors to decide when things should move and when they should wait. In other words: choreography, not chaos.
A key ingredient is the LEGO Icons 10303 Loop Coaster hardware—tall elevator tower, double loops, and the newer rail geometries that make high-energy layouts possible. The set provides the gravity-fed thrills; the code and sensors provide the reliability and timing. Lasse’s build shows how these worlds meet: automation keeps the lifts running only when a train needs it, and sensors at strategic points tell the system exactly where each train is. The result is a compact, reliable “dueling coaster” effect that feels like a proper attraction.
On the sensing side, the model employs WeDo 2.0 distance sensors to detect trains and a Boost color/distance sensor as a friendly, visitor-facing “start” trigger—a small green-light moment that invites interaction without risking mayhem. That simple UX detail encourages people to press the button at the right time while the program guards for safety and spacing. These choices—what to sense, where to sense, and what to do with the information—are what elevate a pretty coaster into a dependable showpiece.
If you’ve never touched Pybricks, don’t worry: the environment is designed to run Python directly on LEGO hubs and exposes straightforward APIs for motors and sensors (think “run the lift motor until a condition is true,” or “wait until the distance sensor sees a car”). Once you’ve planned a few states (IDLE → LIFT → RELEASE → CLEAR LOOP), you’ll be surprised how approachable train/ride automation becomes. That’s why this video matters for MOC builders: it’s a blueprint for building experiences—repeatable, interactive, and safe—rather than one-off stunts.
Tips: How to use this technique in your own builds
-
Pick your control stack early.
Use a Spike Prime (45678) or a Powered Up/City/Technic hub that Pybricks supports. Make sure the hub you choose can talk to your chosen sensors and motors. -
Start with one train, one loop, one sensor.
Prototype a tiny “state machine”:
-
IDLE (wait for Boost color sensor = “go”)
-
LIFT (run motor until top-of-lift trigger trips)
-
RELEASE (coast)
-
BLOCKED/CLEAR (use a WeDo distance sensor to confirm the loop is free).
-
Place sensors where decisions happen.
Mount WeDo distance sensors before merge points/loops and just after the lift crest. That gives the code enough warning to halt a lift, delay a release, or stagger dispatches. -
Calibrate speed & friction, then lock it in.
Even small changes (car mass, track alignment) change loop reliability. Nudge lift speeds and drop heights until trains clear the elements comfortably—then fix those parameters in code so they’re consistent run-to-run. (The 10303’s elevator and loops give you a stable baseline.) -
Debounce everything.
Sensor flicker is real. In Pybricks, sample a few times before changing states, and add minimum-time windows so a single pass doesn’t trigger multiple events. -
Only run lifts when needed.
Mirroring Lasse’s approach, keep lifts idle unless a train is queued. It reduces wear, saves battery, and keeps the show pacing clean. -
Add failsafes.
Create a “STOP ALL” state if a sensor reads something unexpected for too long (e.g., a stalled car). Require a manual reset on the Boost start sensor to resume. -
Serviceability matters.
Leave quick access to lift chains, the top bull gear, and sensor mounts. You’ll thank yourself during events.
Ideas: MOC types that shine with this automation
-
Dueling/Intertwined Coasters: Race trains with timed “near-miss” crossings and alternating dispatch logic—exactly the spectacle in the video, scaled to your table.
-
Block-section Train Layouts: Use distance sensors to implement real railway “blocks” so multiple trains share track safely with automated signals.
-
Interactive Fairground Hub: A Boost start post that guests tap to trigger any ride: coaster dispatch, carousel spin, pendulum sweep—each with cooldowns and show pacing.
-
Dark-Ride Show Control: Synchronize vehicle movement with lights/doors/animatronics using Pybricks timers and sensor cues.
-
Ferris Wheel + Loading Gates: Sensors confirm an empty bucket at the platform before the wheel indexes—great for public demos.
-
Swinging Ship with Soft Braking: Control amplitude via motor speed and timed “coast/hold” commands for repeatable arcs.
-
Drop Tower with Safe Release: Motorized haul + sensor-verified catch, then a snappy, code-timed drop.
-
Mini-Monorail Network: Automatic station stops and priority merges on a compact city diorama.
-
Staged Parades: Vehicles leave backstage on a schedule, pause for “show moments,” and return—no human babysitting.
-
Water-splash Gag: Triggered splash effect when a car dips below grade—a playful expansion Lasse even discusses in the forum thread.
Lasse’s intertwined loop coaster is more than a cool clip—it’s a lesson in building repeatable thrills with sensors, code, and a rock-solid physical layout. Start small, add one decision point at a time, and you’ll quickly discover that Pybricks turns your rides into reliable, crowd-pleasing attractions. When you’re ready to level up, borrow the playbook from the video: sense what matters, move only when it’s safe, and design for show pacing. Your theme park won’t just look alive—it’ll run like one.
Disclaimer: This article was created with the assistance of AI. While efforts have been made to ensure accuracy and originality, the content may include automatically generated text and should be considered as informational only.