3 Clever Mini LEGO Safes You Can Build Today
Share
Inspired by a YouTube tutorial that shows three working mini safes—no Technic pieces required
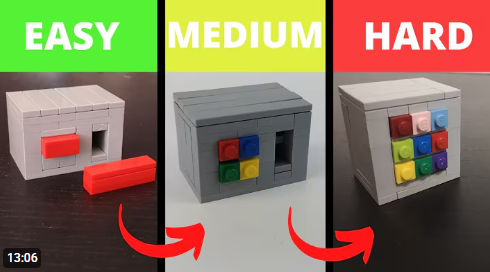
If you’ve ever wanted to hide a tiny treasure in a brick-built lockbox, this video is the perfect spark. In “How to make 3 mini Lego Safes!!” the creator demonstrates three compact, working safes you can assemble from common system bricks—no Technic elements needed. Each safe uses simple geometry, plate-and-tile layering, and smart tolerance tricks to create satisfying locks that open only with the right move (including one that uses a key or keycard).
What makes these builds special is how approachable they are. Many LEGO locks rely on axles, gears, and cams; here, the locking action comes from the way plates slide, tiles capture studs, and “SNOT” brackets create sideways lips that act like tumblers. The result is a set of mini safes you can drop into a city scene, a playroom heist MOC, or a puzzle display—each with a door that actually stays shut until you perform the correct action. Because the mechanisms are built from standard bricks, they’re easy to color-match to your layout and quick to reconfigure. Swap a tile for a jumper to change the “feel” of the lock. Add a cheese slope to create a cam surface. Use headlight bricks or brackets to form ledges that catch and release a latch. All of these are simple tweaks that dramatically change how the safe opens, without adding complexity.
Another bonus: the parts are likely already in your collection. Tiles (1×2, 2×2), plates (1×2 and 2×3), jumpers, brackets, and 1×1 round plates are the heroes here. That means you can experiment fast—iterate through prototypes, test the friction, and fine-tune tolerances until the door snaps closed with that perfect “click.” The video walks through three distinct mini designs, including one that reads a key or keycard-style insert. That keycard idea is brilliant for storytelling: imagine a minifigure sliding a flat “badge” into a reader slot. It’s visually obvious, play-friendly, and instantly communicates “this is locked.”
From a builder’s perspective, these safes are tiny lessons in mechanical thinking. You’ll learn how to:
-
Capture a tongue or tab behind a tile lip.
-
Use half-plate offsets with jumpers to create “can’t pass” edges.
-
Employ studs-not-on-top (SNOT) to form internal guides for sliding parts.
-
Exploit clutch power—tight enough to hold, loose enough to release on command.
Because the footprints are small, you can embed them anywhere: behind a shop counter in your modular street, inside a bank vault vignette, under a removable floor in a pirate hideout, or tucked into a spaceship cargo bay. And since there’s no Technic to telegraph “this is mechanical,” the secret stays secret—just a clean, studded surface that hides a neat interaction beneath. If you’re building for kids, it’s also a great introduction to puzzle design: define an input (insert keycard, align colors, slide tab), a rule (only this pattern works), and feedback (door opens). That’s game design in bricks.
Tips for Building & Using Mini LEGO Safes
-
Start with tight framing. Box in the mechanism with plates and brackets so moving parts can’t flex sideways. That’s the #1 cause of accidental openings.
-
Tune friction with tiles. If a slider is sticky, add a tile “track.” If it’s too loose, introduce a stud contact (a jumper) so it lightly “clicks” into place.
-
Make the key unmistakable. For the key/keycard version, use a distinct color combo or printed tile so players know what to insert and which way.
-
Hide “red herrings.” Add a fake panel or decoy slot to increase puzzle depth without changing the core mechanism.
-
Reinforce the hinge. Use 2–3 studs of connection around the door’s perimeter; add a plate frame to resist prying.
-
Test with repeated cycles. Open/close 30–50 times to ensure clutch power is consistent across parts. Swap any loose or overly tight elements.
-
Never use for real security. These are toys and puzzles—great for play and display, not for valuables.
MOC Ideas That Use These Safe Techniques
-
Bank Heist Micro-Scene: Teller counter with a rear safe; add a keycard reader for a “mission” play feature.
-
Modular Building Easter Egg: Hide a mini safe behind a picture frame or under a stairs module.
-
Pirate Treasure Chest with Lock: Use a sliding tongue that releases only when a 1×2 “key tile” is inserted.
-
Sci-Fi Cargo Crate: Color-coded inserts unlock different compartments (red opens tools, blue opens rations).
-
Escape-Room Puzzle Box: Stack two mechanisms—first a slider alignment, then the keycard—so players solve in sequence.
-
Vending/Prize Machine: Insert tile “coins” to trigger a latch and dispense a 1×1 round “candy.”
-
Knight’s Strongbox (Castle): Wooden-look tiles outside, hidden jumper-tab lock inside.
-
Desk Drawer Safe (City): A 6×6 drawer that won’t pull out until a side tab is depressed.
Mini LEGO safes are the perfect blend of smart design and playful storytelling: quick to build, endlessly re-skinnable, and surprisingly satisfying to crack. If the three no-Technic designs from the video get you hooked, try remixing them—swap the door direction, change the key shape, or chain two locks together for an “expert” version. Most of all, have fun experimenting until the mechanism feels just right. Then tuck your new safe into a scene and watch your minifigures guard their treasure with pride. Happy building!
Disclaimer: This article was created with the assistance of AI. While efforts have been made to ensure accuracy and originality, the content may include automatically generated text and should be considered as informational only.

